总结一下之前学习过的在blackbone中的一个x86程序中获取x64位进程函数地址的方法,之前就已经系统地梳理了一遍,今天贴出来分享一下。
这个程序的目的说白了就是要让让运行在Wow64环境中的x86应用程序可以获取到x64下ntdll.dll中的Native API的地址,从而能够直接调用x64下ntdll.dll中的Native API。
0x01 理论基础:
在分析源码之前,先讲几个相关的知识点:
1.64位计算机系统下的进程,无论是是32 位或者是 64 位,都映射了两个地址空间,一个 是 32 位,一个是 64 位。所以 32 位和 64 位,可以理解为一个进程的两种工作模式,并且这 两种工作模式可以切换。
2.64位计算机系统下的进程,每个32位进程都会加重ntdll32.dll和ntdll.dll模块。其中ntdll.dll是64位模块。我们可以将进程的32位模式切换到64位,获取64位的ntdll中的导出函数来使用,这样就能够操作64位的进程。
功能实现的逻辑:
1. 进程由 32 位变成 64 位 CS: 0x23 -- > 0x32 具体代码如下:利用 retf,把堆栈上的值写进 cs 寄存器,同时保证 ip 的正确性。
2. 获取 64 位模式下的 TEB (r12寄存器指向64位的TEB结构(TEB64))
3. 从 64 位 TEB 获取到 64 位 Ntdll.dll 的地址 TEB->PEB->LDR LDR 匹配的 Ntdll.dll,找到基址
4. 找到需要调用的 Ntdll.dll 的函数 找到 Ntdll.dll 地址,分析 PE 结构,可以找到函数的入口地址。
5. 调用函数 x64 的调用规则,前 4 个参数依次是 rcx, rdx, r8, r9,更多的参数由堆栈传递。 X64Call 这个函数封了 32 位模式下对 64 位函数的调用。
0x02 源码分析
1.32位程序切换到64位模式实现
#define X64_Start() X64_Start_with_CS(0x33)

//switch(x64)
//通过retf将0x33赋值给cs寄存器

#define X64_Start_with_CS(_cs)
    {
    EMIT(0x6A) EMIT(_cs)                         /*  push   _cs             */
    EMIT(0xE8) EMIT(0) EMIT(0) EMIT(0) EMIT(0)   /*  call   $+5             */
    EMIT(0x83) EMIT(4) EMIT(0x24) EMIT(5)        /*  add    dword [esp], 5  */
	EMIT(0xCB)                                   /*  retf                   */
    }
windbg中对应的反汇编代码:
00ad2461 6a33            push    33h
00ad2463 e800000000      call    Demo+0x12468 (00ad2468)
00ad2468 83042405        add     dword ptr [esp],5
00ad246c cb              retf
通过windbg中对应的反汇编代码可以看出操作就是将0x33压栈 原地call将下一条指令地址压栈,再将esp中保存的地址的值加5,那么此时在esp栈顶的地址值将成为retf指令之后的地址值,从而确保了retf之后指令指针寄存器ip的正确性,再retf会pop eip,再pop cs,修改段选择子,这样CS寄存器中原本的值0x23就变成了0x33,同时保证了指令指针寄存器中的eip的正确性。
话不多说,直接看windbg中esp栈顶地址最直白:
push 33h 之后的栈顶地址内容:(0x33被压入栈顶)
00ad2463 e800000000 call Demo+0x12468 (00ad2468) 之后的栈顶内容(call指令的下一跳指令的地址00ad2468被压入栈顶)

00ad2468 83042405 add dword ptr [esp],5 之后的栈顶内容(栈顶保存的地址加了5个字节大小,其实也就是到了retf指令之后的地址,这里的00ad246d将成为rip寄存器中的值)

最终retf指令执行过后,将pop eip,再pop cs,即将ad246d的值赋给eip寄存器,将0x33赋值给cs寄存器。
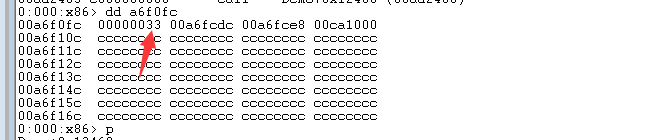
如图,retf前的cs寄存器中的内容为0x23:

retf后~化腐朽为神奇了!

当前rip寄存器中的ad246d正是之前esp栈顶中的值,cs寄存器中的值被修改为0x33了,顿时windbg的整个画风都变了。此时就成功切换到了64位模式下啦。
2.获取32位进程64位模式下的TEB地址
union Register64
{
DWORD64 dw64;
DWORD dw[2];
};
//定义一个寄存器
Register64 v1;
v1.dw64 = 0;
X64_Push(_R12);
	// below pop will pop QWORD from stack, as we're in x64 mode now
	//将R12pop给v1 TEB在其中
	__asm pop v1.dw[0]

    #define X64_Push(Value) EMIT(0x48 | ((Value) >> 3)) EMIT(0x50 | ((Value) & 7))
直接上windbg中对应的汇编指令:
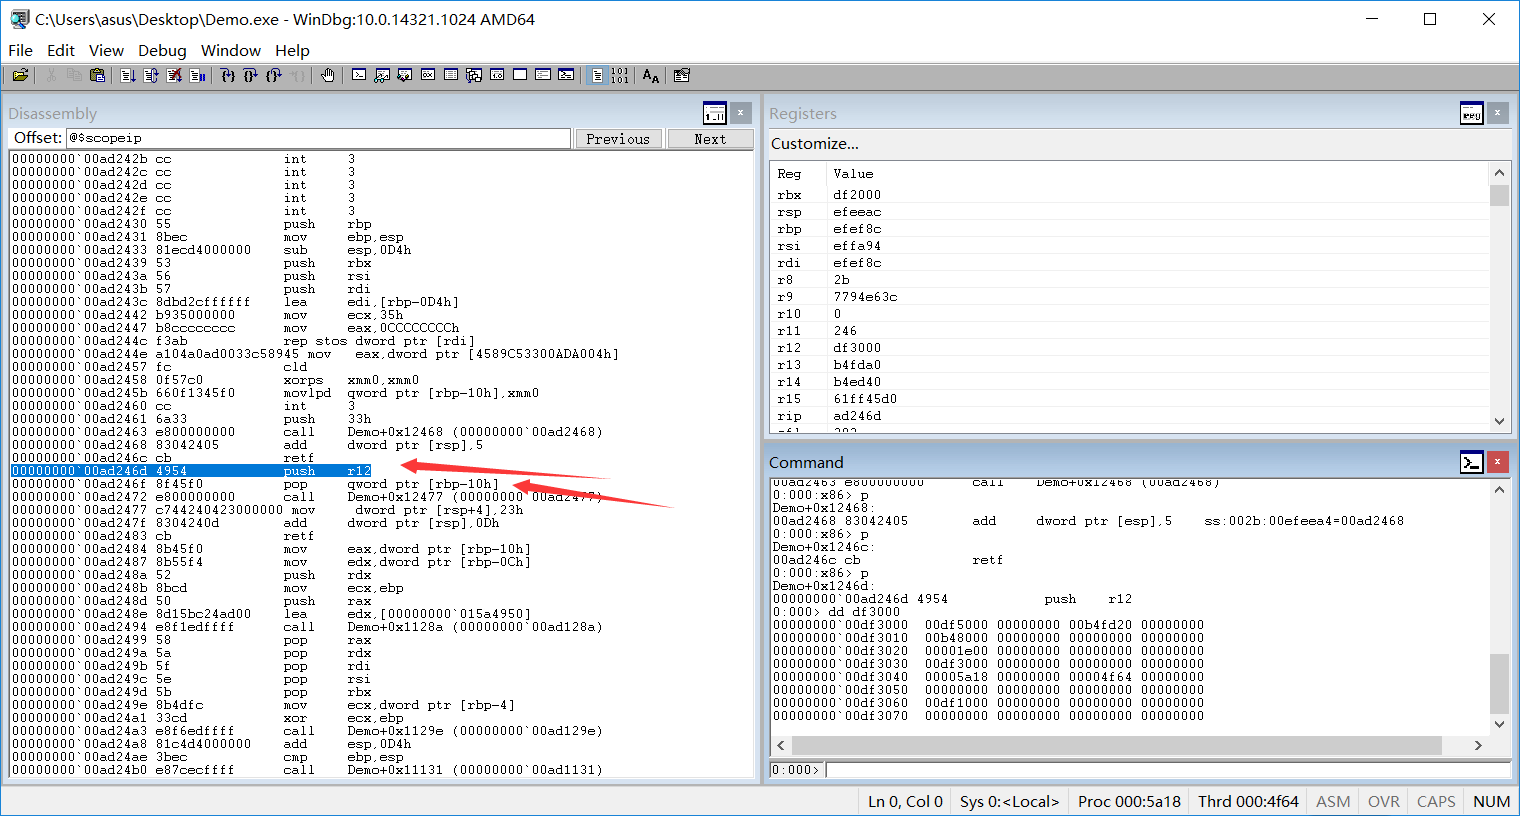
push r12这条指令,因为不能使用嵌入式汇编表示64寄存器,所以采用机器码书写,随后再将r12寄存器中的值保存到我们的局部变量中,成功取得了TEB的地址(r12寄存器指向64位的TEB结构(TEB64)),这时候再切换回32位模式,将TEB中的内容赋值给我们自定义的结构体:
template <class T>
struct _TEB_T_
{
	_NT_TIB_T<T> NtTib;
	T EnvironmentPointer;
	_CLIENT_ID<T> ClientID;
	T ActiveRpcHandle;
	T ThreadLocalStoragePointer;
	T ProcessEnvironmentBlock;
	DWORD LastErrorValue;
	DWORD CountOfOwnedCriticalSections;
	T CsrClientThread;
	T Win32ThreadInfo;
	DWORD User32Reserved[26];
};

typedef _TEB_T_<DWORD> TEB32;
typedef _TEB_T_<DWORD64> TEB64;
3.获取PEB地址
这里我们通过自定义的TEB结构体和之前获取的TEB结构体来得到PEB的基地址
在/32位下切入64位模式执行64位汇编实现字符串copy:


 1     PEB64 Peb;
 2     GetMemoy64(&Peb, Teb.ProcessEnvironmentBlock, sizeof(PEB64));
 3
 4         //32位下执行64位汇编实现字符串copy
 5 void GetMemoy64(void* DestinationMemory, DWORD64 SourceMemory, size_t SourceMemoryLength)
 6 {
 7     if ((NULL == DestinationMemory) || (0 == SourceMemory) || (0 == SourceMemoryLength))
 8         return;
 9
10     Register64 v1 = { SourceMemory };
11 #ifdef _M_IX86
12     __asm
13     {
14         X64_Start();
15
16         ;// below code is compiled as x86 inline asm, but it is executed as x64 code
17         ;// that's why it need sometimes REX_W() macro, right column contains detailed
18         ;// transcription how it will be interpreted by CPU
19
20         push   edi;// push     rdi
21         push   esi;// push     rsi
22         mov    edi, DestinationMemory;        // mov      edi, dword ptr [dstMem]        ; high part of RDI is zeroed
23   REX_W mov    esi, v1.dw[0];                 // mov      rsi, qword ptr [_src]    REX_W 自减
24         mov    ecx, SourceMemoryLength;       // mov      ecx, dword ptr [sz]            ; high part of RCX is zeroed
25
26         mov    eax, ecx;       // mov      eax, ecx
27         and    eax, 3;         // and      eax, 3
28         shr    ecx, 2;         // shr      ecx, 2
29
30         rep    movsd;          // rep movs dword ptr [rdi], dword ptr [rsi]
31
32         test   eax, eax;       // test     eax, eax
33         je     _move_0;        // je       _move_0
34         cmp    eax,1;          // cmp      eax, 1
35         je     _move_1;        // je       _move_1
36         movsw                  // movs     word ptr [rdi], word ptr [rsi]
37         cmp    eax, 2;         // cmp      eax, 2
38         je     _move_0;        // je       _move_0
39 _move_1:
40         movsb                  // movs     byte ptr [rdi], byte ptr [rsi]
41
42 _move_0:
43         pop    esi;// pop      rsi
44         pop    edi;// pop      rdi
45
46         X64_End();
47     }
48 #endif
49 }
4.通过PEB得到PEB_LDR_DATA64的地址,在通过遍历PEB_LDR_DATA64结构中的链表,找到ntdll.dll的基地址。回忆一下这经常用到的LDR结构和它令人心动的三条LIST_ENTRY链表~~~
typedef struct _PEB_LDR_DATA
{
 ULONG Length;
 BOOLEAN Initialized;
 PVOID SsHandle;
 LIST_ENTRY InLoadOrderModuleList;
 LIST_ENTRY InMemoryOrderModuleList;
 LIST_ENTRY InInitializationOrderModuleList;
} PEB_LDR_DATA,*PPEB_LDR_DATA;
	PEB_LDR_DATA64 PebLdrData;
	GetMemoy64(&PebLdrData, Peb.Ldr, sizeof(PEB_LDR_DATA64));
DWORD64 LastEntry = Peb.Ldr + offsetof(PEB_LDR_DATA64, InLoadOrderModuleList);
LDR_DATA_TABLE_ENTRY64 LdrDataTableEntry;
LdrDataTableEntry.InLoadOrderLinks.Flink = PebLdrData.InLoadOrderModuleList.Flink;
do
{
//遍历链表
GetMemoy64(&LdrDataTableEntry, LdrDataTableEntry.InLoadOrderLinks.Flink, sizeof(LDR_DATA_TABLE_ENTRY64));
wchar_t BaseDllName[MAX_PATH] = { 0 };
//得到模块名
GetMemoy64(BaseDllName, LdrDataTableEntry.BaseDllName.Buffer, LdrDataTableEntry.BaseDllName.MaximumLength);
if (0 == _wcsicmp(ModuleName, BaseDllName))
return LdrDataTableEntry.DllBase;
} while (LdrDataTableEntry.InLoadOrderLinks.Flink != LastEntry);
到目前为止,我们已经成功get了64位模式下的ntdll.dll的基地址了。
5.解析PE结构导出表,得到对应的函数地址。
DWORD64 GetFunctionAddressFromExportTable64(WCHAR* ModuleName,char* FunctionName)
{
	DWORD* AddressOfFunctions = 0;
	WORD*  AddressOfNameOrdinals = 0;
	DWORD* AddressOfNames = 0;
	DWORD64 ModuleBase = GetModuleHandle64(ModuleName);
	if (0 == ModuleBase)
		return 0;
	__try
	{
		IMAGE_DOS_HEADER ImageDosHeader;
		GetMemoy64(&ImageDosHeader, ModuleBase, sizeof(IMAGE_DOS_HEADER));

		IMAGE_NT_HEADERS64 ImageNtHeaders;
		GetMemoy64(&ImageNtHeaders, ModuleBase + ImageDosHeader.e_lfanew, sizeof(IMAGE_NT_HEADERS64));

		IMAGE_DATA_DIRECTORY& ImageDataDirectory =
			ImageNtHeaders.OptionalHeader.DataDirectory[IMAGE_DIRECTORY_ENTRY_EXPORT];

		if (0 == ImageDataDirectory.VirtualAddress)
			return 0;

		IMAGE_EXPORT_DIRECTORY ImageExportDirectory;

		GetMemoy64(&ImageExportDirectory, ModuleBase + ImageDataDirectory.VirtualAddress, sizeof(IMAGE_EXPORT_DIRECTORY));

		AddressOfFunctions = (DWORD*)malloc(sizeof(DWORD)*ImageExportDirectory.NumberOfFunctions);
		if (NULL == AddressOfFunctions)
		{
			return 0;
		}
		//得到函数地址数组
		GetMemoy64(AddressOfFunctions, ModuleBase + ImageExportDirectory.AddressOfFunctions, sizeof(DWORD)*ImageExportDirectory.NumberOfFunctions);

		 AddressOfNameOrdinals = (WORD*)malloc(sizeof(WORD)*ImageExportDirectory.NumberOfFunctions);
		if (NULL == AddressOfNameOrdinals)
		{
			return 0;
		}
		//得到索引数组
		GetMemoy64(AddressOfNameOrdinals, ModuleBase + ImageExportDirectory.AddressOfNameOrdinals, sizeof(WORD)*ImageExportDirectory.NumberOfFunctions);

		AddressOfNames = (DWORD*)malloc(sizeof(DWORD)*ImageExportDirectory.NumberOfNames);
		if (nullptr == AddressOfNames)
		{
			return 0;
		}
		//根据函数名得到函数索引
		GetMemoy64(AddressOfNames, ModuleBase + ImageExportDirectory.AddressOfNames, sizeof(DWORD)*ImageExportDirectory.NumberOfNames);
		for (DWORD i = 0; i < ImageExportDirectory.NumberOfFunctions; i++)
		{
			if (!CompareMemory64(FunctionName, ModuleBase + AddressOfNames[i],
				strlen(FunctionName) + 1))
				continue;
			else
				//根据索引得到函数相对地址 基地址+相对地址=函数绝对地址
				return ModuleBase + AddressOfFunctions[AddressOfNameOrdinals[i]];
		}
	}
	__finally
	{
		if (AddressOfFunctions != NULL)
		{
			free(AddressOfFunctions);
			AddressOfFunctions = NULL;

		}
		if (AddressOfNameOrdinals != NULL)
		{
			free(AddressOfNameOrdinals);
			AddressOfNameOrdinals = NULL;
		}
		if (AddressOfNames != NULL)
		{
			free(AddressOfNames);
			AddressOfNames = NULL;
		}
	}

	return 0;
}