问题说明,在vagrant虚拟机中启动cii 框架项目的时候没问题,但在启动laravel项目的时候花费17S,这明显不符合常理吗?
造成此问题的原因,是虚拟机共享文件系统 IO 速度慢所导致的。而一个全新安装的 Laravel 应用响应一个请求时,需要读取 600+ 的文件,瓶颈尤为明显。

补充:以下亲测可行方法
1.本地Mac系统不需要安装,我的是在不清楚的情况下安装了,每次报错,所以卸载就好
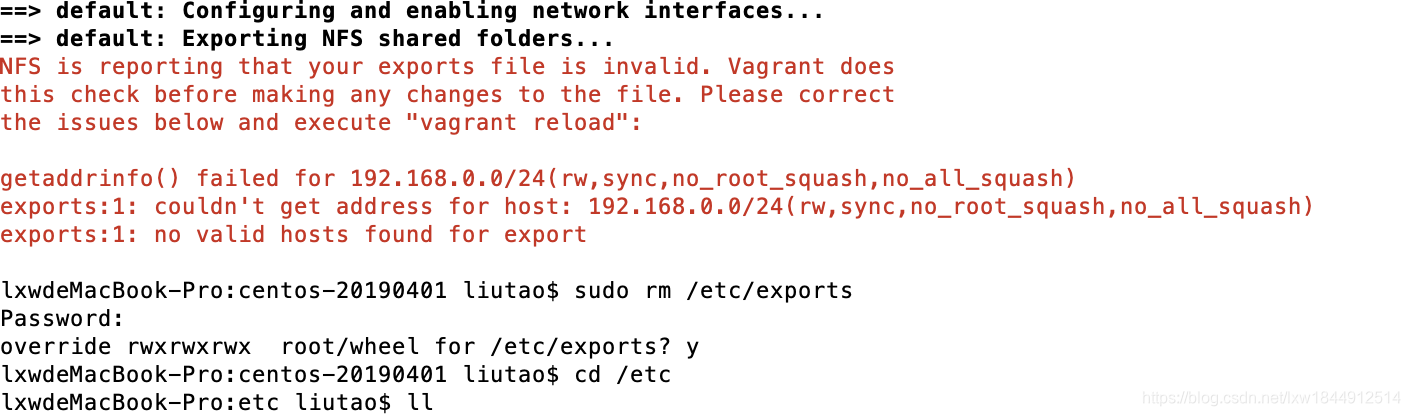
sudo rm /etc/exports
sudo touch /etc/exports
sudo chmod -R 777 exports #有权限问题的话加这一步
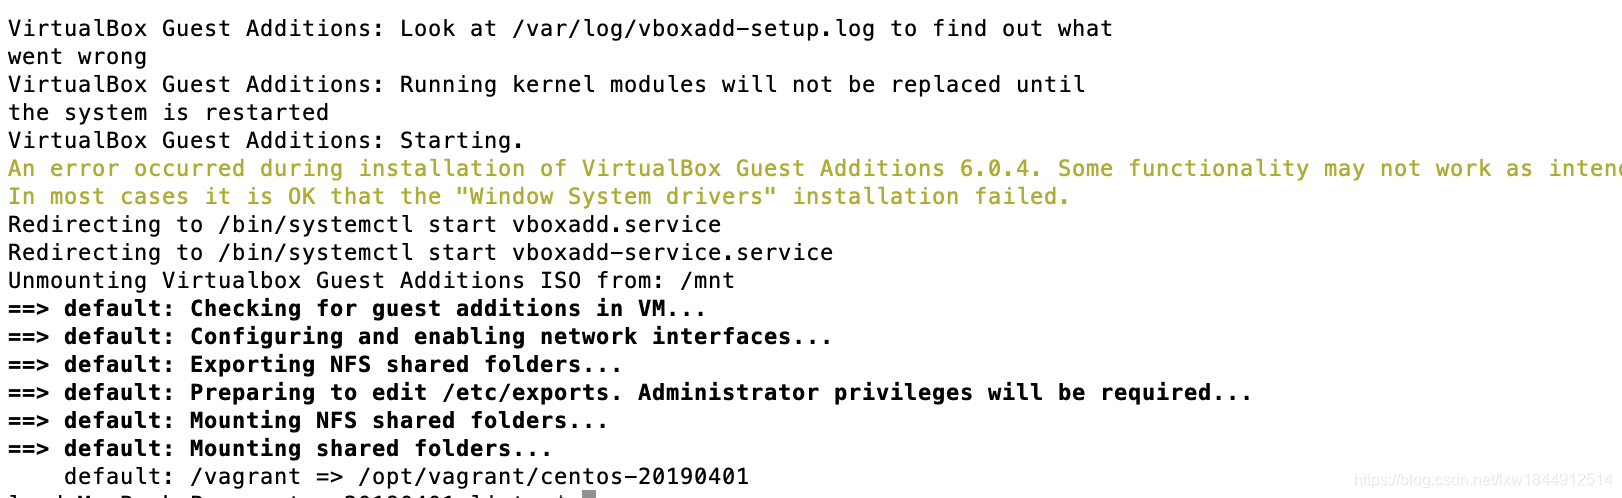
sudo vagrant halt
sudo vagrant up --provision #在启动过程中,会询问是否允许更改exports文件,直接允许就好vagrant plugin uninstall vagrant-winnfsd #卸载插件
2修改后: Vagrantfile 文件
# -*- mode: ruby -*-
# vi: set ft=ruby :

# All Vagrant configuration is done below. The "2" in Vagrant.configure
# configures the configuration version (we support older styles for
# backwards compatibility). Please don't change it unless you know what
# you're doing.
Vagrant.configure("2") do |config|
  # The most common configuration options are documented and commented below.
  # For a complete reference, please see the online documentation at
  # https://docs.vagrantup.com.

  # Every Vagrant development environment requires a box. You can search for
  # boxes at https://vagrantcloud.com/search.
  config.vm.box = "centos"
  config.vm.boot_timeout = 360
  config.ssh.username = "vagrant"
  config.ssh.password = "vagrant"
  # Disable automatic box update checking. If you disable this, then
  # boxes will only be checked for updates when the user runs
  # `vagrant box outdated`. This is not recommended.
  # config.vm.box_check_update = false

# config.vm.network "forwarded_port", guest: 82, host: 8082, host_ip: "127.0.0.1"
 #  config.vm.network "forwarded_port", guest: 83, host: 8083, host_ip: "127.0.0.1"
  # config.vm.network "forwarded_port", guest: 84, host: 8084, host_ip: "127.0.0.1"
  # config.vm.network "forwarded_port", guest: 85, host: 8085, host_ip: "127.0.0.1"
  # config.vm.network "forwarded_port", guest: 86, host: 8086, host_ip: "127.0.0.1"
  # config.vm.network "forwarded_port", guest: 87, host: 8087, host_ip: "127.0.0.1"
  # config.vm.network "forwarded_port", guest: 3306, host: 33306, host_ip: "127.0.0.1"
  #  config.vm.network "forwarded_port", guest: 80, host: 8080, host_ip: "localhost"
  # config.vm.network "forwarded_port", guest: 81, host: 8081, host_ip: "localhost"

config.vm.synced_folder "../../../Users/liutao/Desktop/vagrant", "/home/wwwroot/default",nfs: true,  nfs_udp: true
  # Create a forwarded port mapping which allows access to a specific port
  # within the machine from a port on the host machine. In the example below,
  # accessing "localhost:8080" will access port 80 on the guest machine.
  # NOTE: This will enable public access to the opened port
  # config.vm.network "forwarded_port", guest: 80, host: 8080

  # Create a forwarded port mapping which allows access to a specific port
  # within the machine from a port on the host machine and only allow access
  # via 127.0.0.1 to disable public access
  # config.vm.network "forwarded_port", guest: 80, host: 8080, host_ip: "127.0.0.1"

  # Create a private network, which allows host-only access to the machine
  # using a specific IP.

#私有网络
config.vm.network "private_network", ip: "192.168.33.11"

#端口转发
#config.vm.network "forwarded_port", guest: 8080, host: 8080,   auto_correct: true

  # Create a public network, which generally matched to bridged network.
  # Bridged networks make the machine appear as another physical device on
  # your network.
  #  config.vm.network "public_network",ip: "192.168.33.10"

  # Share an additional folder to the guest VM. The first argument is
  # the path on the host to the actual folder. The second argument is
  # the path on the guest to mount the folder. And the optional third
  # argument is a set of non-required options.
  # config.vm.synced_folder "../data", "/vagrant_data"

  # Provider-specific configuration so you can fine-tune various
  # backing providers for Vagrant. These expose provider-specific options.
  # Example for VirtualBox:
  #
   config.vm.provider "virtualbox" do |vb|
  #   # Display the VirtualBox GUI when booting the machine
  #   vb.gui = true
  #
  #   # Customize the amount of memory on the VM:
     vb.memory = "512"
   end
  #
  # View the documentation for the provider you are using for more
  # information on available options.

  # Enable provisioning with a shell script. Additional provisioners such as
  # Puppet, Chef, Ansible, Salt, and Docker are also available. Please see the
  # documentation for more information about their specific syntax and use.
  # config.vm.provision "shell", inline: <<-SHELL
  #   apt-get update
  #   apt-get install -y apache2
  # SHELL
end
修改后的/etc/exports 文件,这个是在vagrant up 启动过程中自动生成的
# VAGRANT-BEGIN: 0 528272d2-254a-4d20-a6cb-19671440688c
"/Users/liutao/Desktop/vagrant" 192.168.33.11 -alldirs -mapall=501:20
# VAGRANT-END: 0 528272d2-254a-4d20-a6cb-19671440688c
成功启动后:
如果报错
sudo rm /etc/exports
sudo touch /etc/exports

sudo chmod -R 777 exports  #有权限问题的话加这一步
================以下仅供参考==============
Vagrant虚拟机系统:CentOS6.5
首先要把虚拟机的网络设置成 :private_network 模式。
1、虚拟机安装nfs服务:
centos 5 :
yum -y install nfs-utils portmapcentos 6 :
yum -y install nfs-utils rpcbind2、MAC OS已经集成nfs,只需要修改/etc/eprots文件,如果没有则新建
sudo vi /etc/exports 保持空文件即可3、Vagrantfile文件修改
config.vm.synced_folder ".", "/vagrant", type: "nfs"保存后,使用命令 vagrant reload 重启虚拟机后才会生效,期间会修改MAC OX的 /etc/exports 文件。会提示输入mac账号的密码。输入即可!
2015-02-02最新更新:vagrant官方说明中发现了一段内同
NFS synced folders have a set of options that can be specified that are unique to NFS. These are listed below. These options can be specified in the final part of theconfig.vm.synced_folder definition, along with the type option.
nfs_export(boolean) – If this is false, then Vagrant won’t modify your/etc/exportsautomatically and assumes you’ve done so already.nfs_udp(boolean) – Whether or not to use UDP as the transport. UDP is faster but has some limitations (see the NFS documentation for more details). This defaults to true.nfs_version(string | integer) – The NFS protocol version to use when mounting the folder on the guest. This defaults to 3.
可以设置 nfs_export的属性为true即可忽略文件的修改,会假设已经把文件设置好。
默认采用的是UDP协议。
NFS协议使用的版本:默认为3
nfs 支持windows
vagrant plugin install vagrant-winnfsdvagrant plugin list卸载插件:https://stackoverflow.com/questions/54294057/vagrant-up-problem-sh-netsh-command-not-found
vagrant plugin uninstall vagrant-winnfsdgit commit 报错:
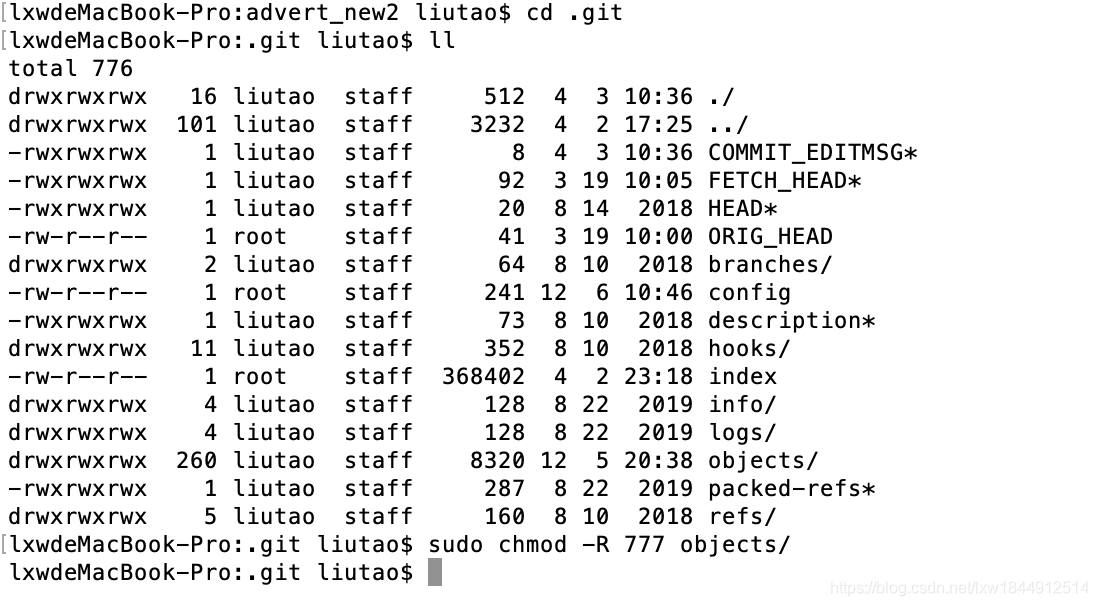
git pull 报错:error: insufficient permission for adding an object to repository database .git/objects
error: insufficient permission for adding an object to repository database .git/objects error: 无法创建树对象解决方案:成功提交文件
在客户端,我的是mac端
sudo chmod 777 -R .git/objects

即可
其他方式:可参考:NFS服务的用户身份映射 【NAS】NFS客户端挂载目录后无写入权限的解决方案
===================以下供参考,据说不太好使=====================
使用 Homestead 在开发 Laravel 应用程序,经常会遇到网页响应速度缓慢,有时甚至十几秒甚至几十秒才返回响应,极大影响了开发体验:
造成此问题的原因,是虚拟机共享文件系统 IO 速度慢所导致的。而一个全新安装的 Laravel 应用响应一个请求时,需要读取 600+ 的文件,瓶颈尤为明显。
解决问题
解决方案是让虚拟机使用 IO 效率更高的 NFS 挂载方式。
第一步、安装 NFS 服务
我们需要在主机的系统里安装 NFS 服务供虚拟机使用。
Mac 用户默认支持 NFS 挂载。
Windows 用户 需要安装 Vagrant WinNFSd ,在你的 Git Shell (或者其他 Windows Shell)里运行以下命令进行安装:
$ vagrant plugin install vagrant-winnfsdUbuntu 用户 可以使用以下命令安装 NFS 服务:
$ apt-get install nfs-kernel-server第二步、修改配置
接下来修改 Homestead.yaml 文件里的 folders 文件挂载信息,指定挂载的 type 为 NFS:
folders:
    - map: ~/code
      to: /home/vagrant/code
      type: "nfs"
第三步、重启并应用虚拟机
因为我们修改了 Homestead.yaml ,需要 --provision 参数来应用虚拟机修改,并使用 reload 来重启虚拟机:
$ vagrant reload --provision结语
以上配置成功后,一般情况下,你应该可以得到 1s 内的响应速度。
转自链接:https://learnku.com/laravel/wikis/2555
setp 1 :centos安装nfs

yum install nfs-utils rpcbind
setp 2 :MAC OS已经集成nfs,只需要修改/etc/exports文件,如果没有则新建

setp 3 : Vagrantfile文件修改

config.vm.synced_folder "~/www", "/data", type: “nfs"

注:~/www为mac机器的目录。/data为虚拟机的目录。
保存后,使用命令 vagrant reload 重启虚拟机后才会生效,期间会修改MAC OX的 /etc/exports 文件。会提示输入mac账号的密码。输入即可!

然后,你会发现mac上的~/www 目录和虚拟机上的/data目录是互通的。开始配置你的网站吧
window可参考: https://blog.csdn.net/ghostyusheng/article/details/64923272
参考:https://gist.github.com/ikennaokpala/79f033880ecd38272a411350c6d573c0

