后端路由:每次仿问都要向 server 发送一个请求,server 需要响应解析,会有延迟「网络不好更严重」;
前端路由:只是改变浏览器的地址,不刷新浏览器,不和服务端交互,所以性能有大大的提高「用户体验提高」,前端路由有两种实现方式
路由的实现方式
1 改变 hash 值,监听 hashchange 事件,可以兼容低版本浏览器;
hash 改变,不会导致浏览器刷新「请求服务器」:

监听路由对页面作出相应的改变:
window.addEventListener("hashchange", function(){
    //变化后输出当前地址栏中的值
    document.getElementById("show-hash-result").innerHTML = "当前的 hash 值是:  "+location.hash;
    //打印出当前 hash 值
    console.log("当前的 hash 值是:"+window.location.hash) ;
});
js获取hash值:
window.location.hash
2 通过 H5 的 history API 来监听 popState 事件,使用 pushState 和 replaceState 实现
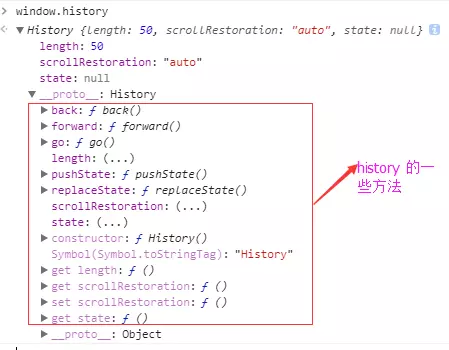
window 的 history 提供了对浏览器历史记录的访问功能,并且它暴露了一些方法和属性,让你在历史记录中自由的前进和后退,并且在 H5 中还可以操作历史记录中的数据。
在 chrome 浏览器的调试窗口中输入 window.history,会得到 history 的一些方法和属性,如下图所示:
back():在历史记录中后退:
history.back() ;
forward:在历史记录中前进:
history.forward();
go():移动到指定的历史记录点:
history.go(-1)
// 其中正数是前进「+1就是前进一个界面」,负责是后退的意思「-1就是后退一个界面」
length: hisgory 的属性,显示 history 的长度。
pushState 给历史记录堆栈顶部添加一条记录:
pushState(data,title[,url]):
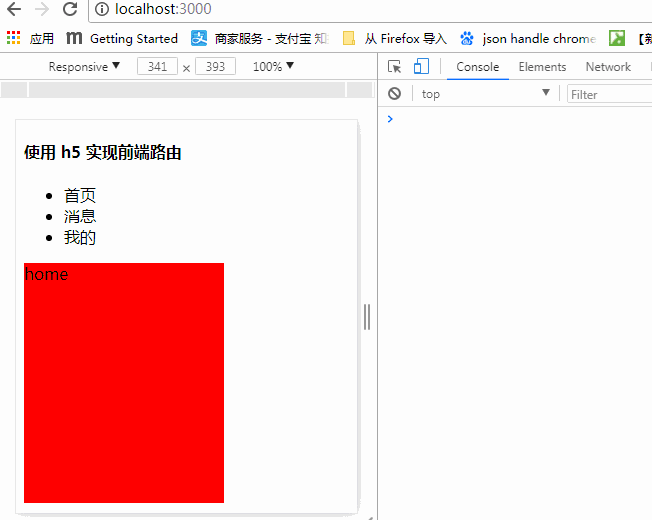
从上面了解到,使用 H5 的 history 的 pushState 可以代替 hash,并且更加优雅,效果图:
源码:
<h4>使用 h5 实现前端路由</h4>
  <ul>
    <li> <a  onclick="home()">首页</a></li>
    <li> <a  onclick="message()">消息</a></li>
    <li> <a  onclick="mine()">我的</a></li>
  </ul>
  <div id="showContent" style="height:240px;200px;background-color:red">
    home
  </div>

  <script type="text/javascript">

    function home() {
      // 添加到历史记录栈中
      history.pushState({name:'home',id:1},null,"?page=home#index")
      showCard('home')
    };

    function message() {
      history.pushState({name:'message',id:2},null,"?page=message#haha")
      showCard('message')
    }

    function mine(){
      history.pushState({
        id:3,
        name:'mine'
      },null,"?name=tigerchain&&sex=man")
      showCard('mine')
    }

    // 监听浏览器回退 并且刷新到指定内容
    window.addEventListener('popstate',function (event) {
      var content = "";
       if(event.state) {
         content = event.state.name;
       }
       console.log(event.state)
       console.log("history 中的历史栈中的 name :"+content)
       showCard(content)
    })
    // 此方法和上面的方法是一毛一样的,只是两种不同的写法而已
    // window.onpopstate = function (event) {
    //   var content = "";
    //   if(event.state) {
    //     content = event.state.name;
    //   }
    //   showCard(content);
    // }

    function showCard(name) {
     console.log("当前的 hash 值是:"+location.hash)
     document.getElementById("showContent").innerHTML = name;
    }
  </script>
vue路由
新建router.js,引入vue 和 vue-router:
import Vue from 'vue';
import VueRouter from 'vue-router';

Vue.use(VueRouter);

export default new VueRouter({
    routes: [
        {
            path: '/',
            name: 'index',
            meta: {
                title: '首页'
            },
            component: index
        },
        {
            path: '/list',
            name: 'list',
            meta: {
                title: '列表'
            },
            component: list
         }
    ]
})
注入到vue实例中:
import router from './router';

new Vue({
    el: '#app',
    template: '<App/>',
    components: { App },
    router,
    store
});
在App.vue中引用:
<template>
    <div id="app">
        <div class="main" :style="{height:cHeight}">
            <transition :enter-active-class="enterActive" :leave-active-class="leaveActive" >
                <keep-alive include="index,list,city">
                    <router-view id="router"></router-view>
                </keep-alive>
            </transition>
            <!-- toast -->
            <Toast></Toast>
            <!-- 提示框 -->
            <Pop-Up></Pop-Up>
            <!-- 接口loading -->
            <div class="loading-box" v-show="isLoading">
                <loadings :contentLoading="isLoading"></loadings>
            </div>
        </div>
        <iphoneX v-if="isIphoneXShow"></iphoneX>
    </div>
</template>
<router-link>
属性:to 、replace、 append、 tag、 active-class、 exact 、 event、 exact-active-class
to:值为当被点击后,内部会立刻把 to 的值传到 router.push(),所以这个值可以是一个字符串或者是描述目标位置的对象,如 to="home" 或 :to="{path: 'home'}";
tag: <router-link> 渲染成的标签,如 <li>;
event:触发跳转路由的事件,默认为cick,如如鼠标移入事件为event="mouseover";
replace:设置 replace 属性,当点击时,会调用 router.replace() 而不是 router.push(),于是导航后不会留下 history 记录;
<router-view>
router-view是承载路由的容器,它渲染的组件是 vue-router 指定的。即在如下图中文件中设置的每个路由项:
嵌套路由
导航组件中有三个导航链接,他们的地址分别为:/food,/rating,/seller,点击每个导航链接都会跳转到相应的组件:
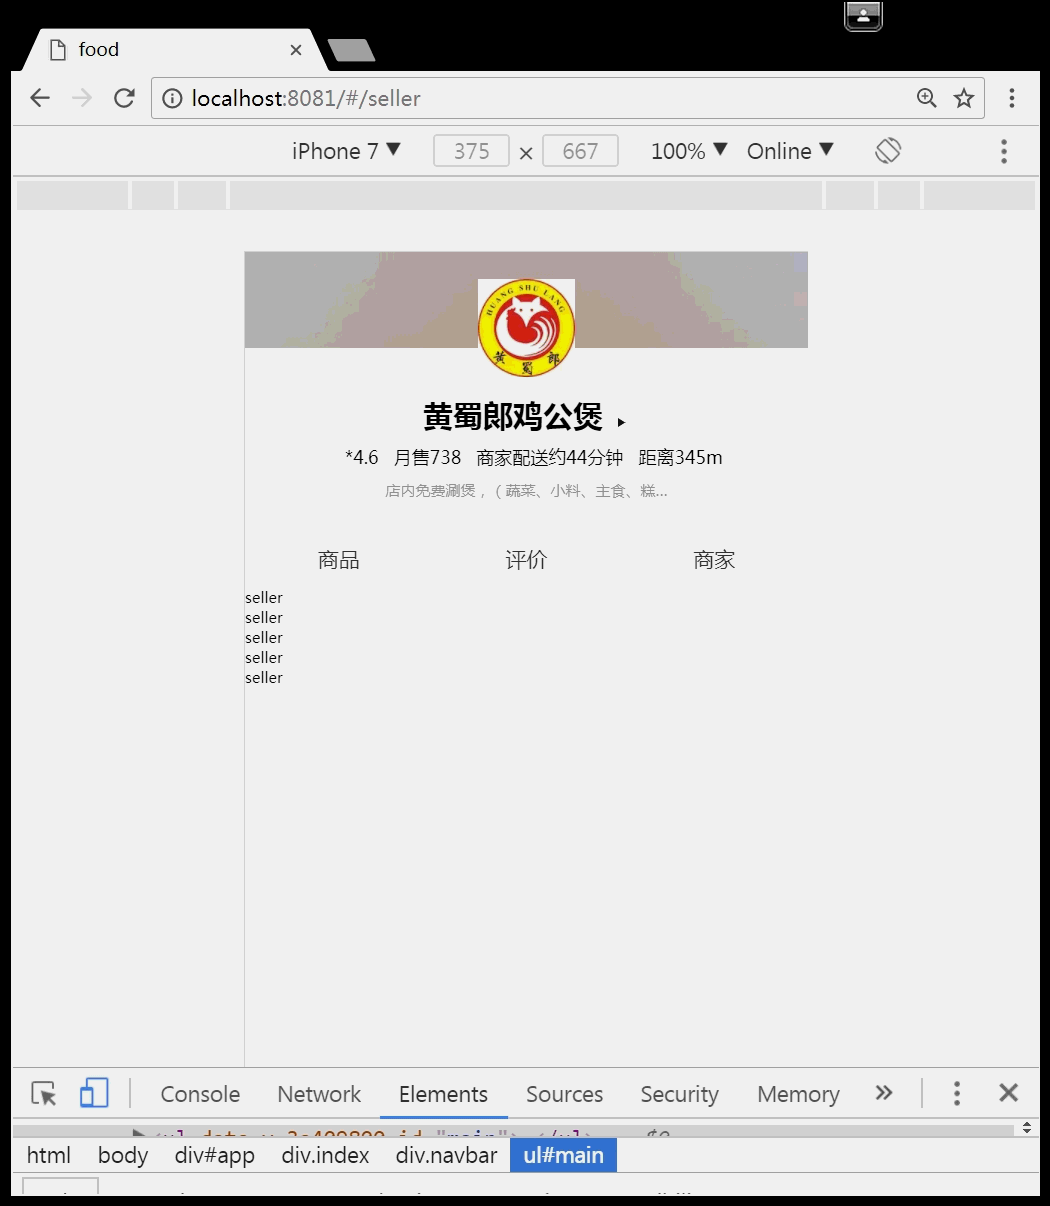
<template>
 <div class="navbar">
 <ul id="main">
 <li><router-link to="/food" >商品</router-link></li>
 <li><router-link to="/rating">评价</router-link></li>
 <li><router-link to="/seller">商家</router-link></li>
 </ul>
   <!-- 路由匹配到的组件将渲染在这里 -->
   <router-view></router-view>
 </div>
</template>
路由配置:
{
    path: '/',
    name: 'index',
    component: index,
    redirect:'/food',
    children:[
        {
        path: 'food',
        name: 'food',
        component: food
        },
        {
        path: 'seller',
        name: 'seller',
        component: seller
        },
        {
        path: 'rating',
        name: 'rating',
        component: rating
        }
    ]
},

路由的过渡动画
想让路由有过渡动画,需要在<router-view>标签的外部添加<transition>标签,在transition标签加上两个类:enter-active-class 和 leave-active-class:
<transition enter-active-class="animated bounce" leave-active-class="animated hinge">
    <router-view></router-view>
</transition>
vue路由钩子函数
全局路由钩子函数
router.beforeEach:全局路由前置守卫,进入每一个路由之前会执行beforeEach里的函数,有next会影响导航:
import router from './router';    // 引入上边的router.js文件

router.beforeEach((to, from, next) => {
     // to是跳转后的页面路由,from是跳转前的页面路由
     // next()是必须要执行的,加上next()路由才会跳转
});
router.afterEach:全局后置钩子,在路由跳转结束的时候调用,没有next不会影响导航:
router.afterEach((to, from) => {
    if( to.meta.title ){
      window.document.title = to.meta.title;   // 每个路由下title
  }else{
    window.document.title = '默认的title';
  }
});
router.beforeResolve(v2,5,0+):全局解析守卫,在 beforeEach 和组件内beforeRouteEnter 之后执行
组件路由钩子函数
beforeRouteEnter:在渲染当前组件的对应路由之前调用,用法和参数与beforeEach类似(在beforeEach之后执行),next需要被主动调用,next中函数的调用在mounted之后:为了确保能对组件实例的完整访问:
beforeRouteEnter (to, from, next) {
  // 这里还无法访问到组件实例,this === undefined
  next( vm => {
    // 通过 `vm` 访问组件实例
  })
}
beforeRouteUpdate(v2.2+):
 beforeRouteUpdate (to, from, next) {
    // 在当前路由改变,但是该组件被复用时调用
    // 可以访问组件实例 `this`
  },
beforeRouteLeave:离开当前路由时调用
beforeRouteLeave(to, from, next){
    // 当离开组件时,是否允许离开,可以访问组件实例'this'
  next();
}
$route 和 $router的区别
router是VueRouter的一个对象,通过VueRouter构造函数得到一个router的实例对象,这个对象中是一个全局的对象,他包含了所有的路由包含了许多关键的对象和属性:

route是单个的路由对象,每一个路由都会有一个route对象,是一个局部的对象,可以获取对应的name,path,params,query等:

路由跳转
1 router-link
<router-link :to="{name:'home', params: {id:1}}">
2 跳转到指定url路径,并想history栈中添加一个记录,点击后退会返回到上一个页面
this.$router.push({name:'home',params: {id:'1'}})
3 跳转到指定url路径,但是history栈中不会有记录,点击返回会跳转到上上个页面 (就是直接替换了当前页面)
this.$router.replace()
// 用法同push
4 向前或者向后跳转n个页面,n可为正整数或负整数
// 在浏览器中前进一步,等同于history.forward()
this.$router.go(1)

// 在浏览器中后退一步,等同于history.back()
this.$router.go(-1)

// 前进三步
this.$router.go(3)

// 如果history中的记录不够用,默认失败
this.$router.go(100)
this.$router.go(-100)
路由传参
1 路径带参数
// 直接调用$router.push 实现携带参数的跳转
this.$router.push({
    path: `/describe/${id}`,
});

// 需要对应的路由配置
{
     path: '/describe/:id',
     name: 'Describe',
     component: Describe
}

// 获取
this.$route.params.id
2 通过路由属性中的name来确定匹配的路由,通过params来传递参数
// 参数配置
this.$router.push({
          name: 'Describe',
          params: {
            id: id
          }
});
// 路由配置
{
     path: '/describe',
     name: 'Describe',
     component: Describe
}
// 获取
this.$route.params.id
3 使用path来匹配路由,然后通过query来传递参数
// 跳转带参数
this.$router.push({
          path: '/describe',
          query: {
            id: id
          }
});
// 路由配置
{
     path: '/describe',
     name: 'Describe',
     component: Describe
}
// 获取
this.$route.query.id
router的模式
包括三种模式:
Hash: 使用URL的hash值来作为路由。支持所有浏览器;
History: 依赖HTML5 History API 和服务器配置;
Abstract: 支持所有javascript运行模式。如果发现没有浏览器的API,路由会自动强制进入这个模式;
hash:hash模式背后的原理是onhashchange事件,可以在window对象上监听这个事件:
window.onhashchange = function(event){
    console.log(event.oldURL, event.newURL);
}
history:监听onpopstate,包括了pushState、replaceState两个方法,这两个方法接收三个参数:stateObj,title,url
原文:
https://www.jianshu.com/p/9a7d79249741